
NBT: Using Debian to clone your storage

If you want to replace your hard drive in your PC without loosing any data. Follow these steps.
1) Start by acquiring a USB Flash Drive. The data on this flash drive will be lost in this process, so if you are not starting with a fresh new flash drive, back up this data.
2) Download a program called Rufus. https://rufus.ie
3) Download a live image of Debian. This file will be something like debian-live-[version]-[arch]-[branch].iso. The [version] should be the latest, the [arch] should be whatever your CPU supports, most likely amd64, and the [branch] should be stable.
4) Install and run Rufus. Ensure your USB drive is selected in the "Device" field. under "Boot selection" make sure it says "Disk or ISO image (Please select)" and just to the right of that click "Select". Search for the .iso you downloaded from Debian.org. Finally click Start at the bottom. and go through the prompts. It may ask to download some linux files from the internet, please allow it to do this.
5) Once Rufus has completed the creation of your bootable USB, you can boot to it. This might involve modifying the boot priority in your BIOS. It is best to look at your motherboard manufacturer's manual on how to do this.
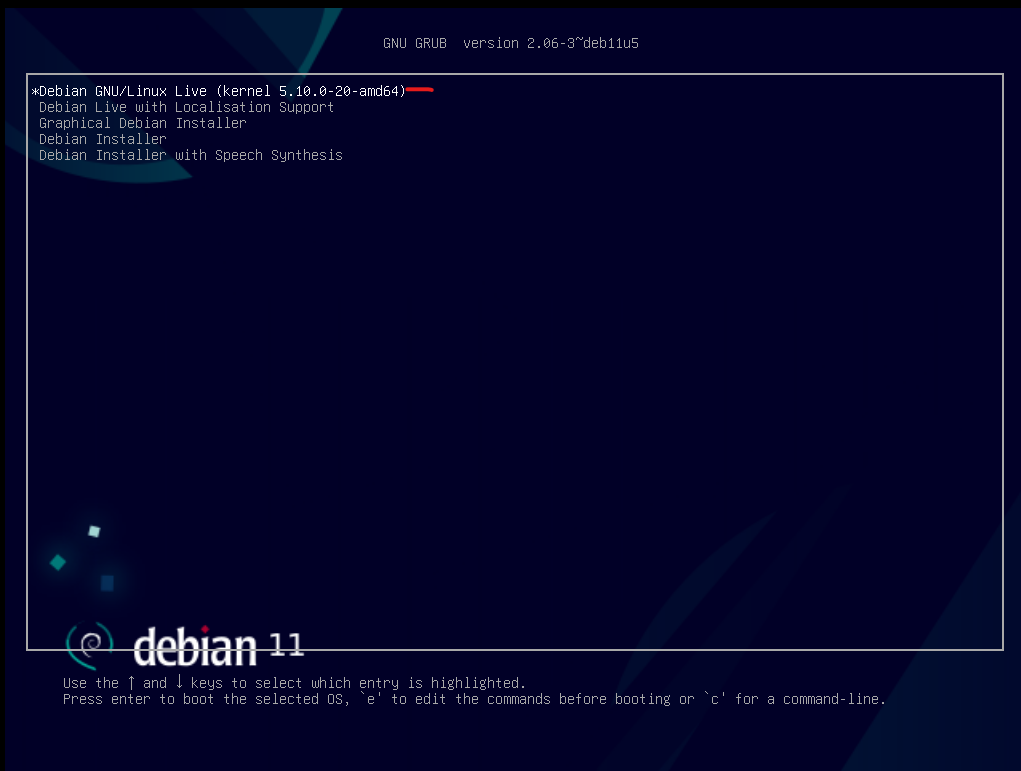
6) Once booted into your USB, you will see the Debian GRUB boot option menu. Please select "Debian GNU/Linux Live (kernel [version]-[arch])"
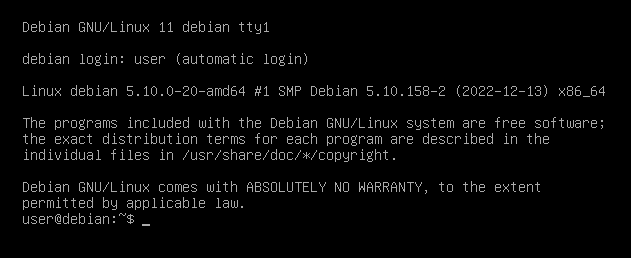
7) Allow Debian to boot and load. You may see a lot of text on your screen or none at all. You eventually want to end up at the user@debian:~$ prompt.
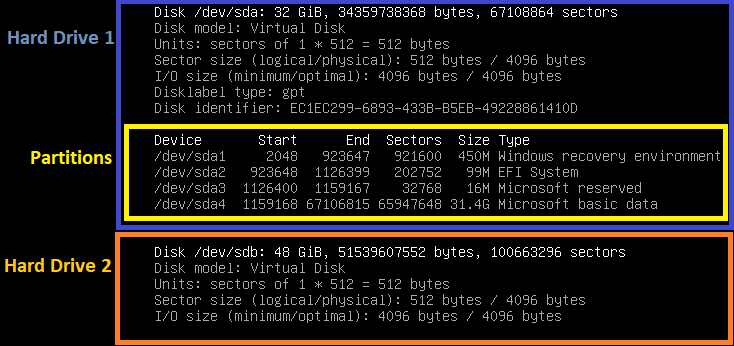
8) Lets take some inventory by inspecting the storage devices. Do this by issuing the command sudo fdisk -l and you will be prompted with a few different disks. It is important to properly identify the "source" disk (the disk you will be copying from) and the "destination" disk (the disk you will be copying to). So the source disk will be your old hard drive and the one with the data on it. The destination disk will be your new blank hard drive.
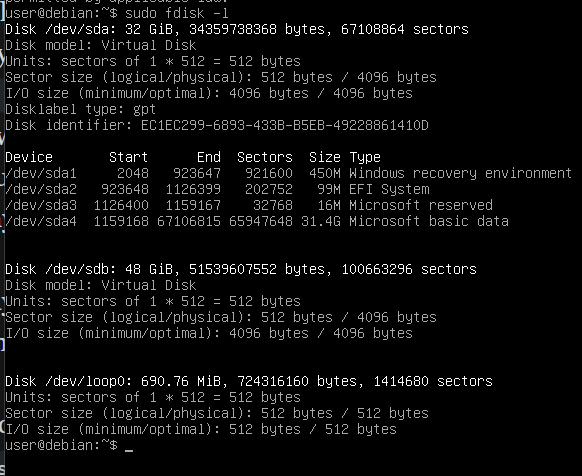
In my example, a 32GB hard drive is being replaced by a 48GB solid state drive. So my source disk is /dev/sda and my destination disk is /dev/sdb. You want to be careful determining which is your source and which is your destination. Getting this mixed up will destroy your data.
One way, which is very easy especially if you are copying to a brand new hard drive, is by looking at the partitions. In linux, the hard drive is the sdx part where the x is any letter. and the partition will be a number after this. So you may have /dev/sda1, /dev/sda2, and /dev/sda5. These are all partitions on the /dev/sda disk. A brand new hard drive might not have any partitions. In our case, we have a /dev/sdb but no sdb entries with a number. In other words, our sdb drive does not have any partitions on it.
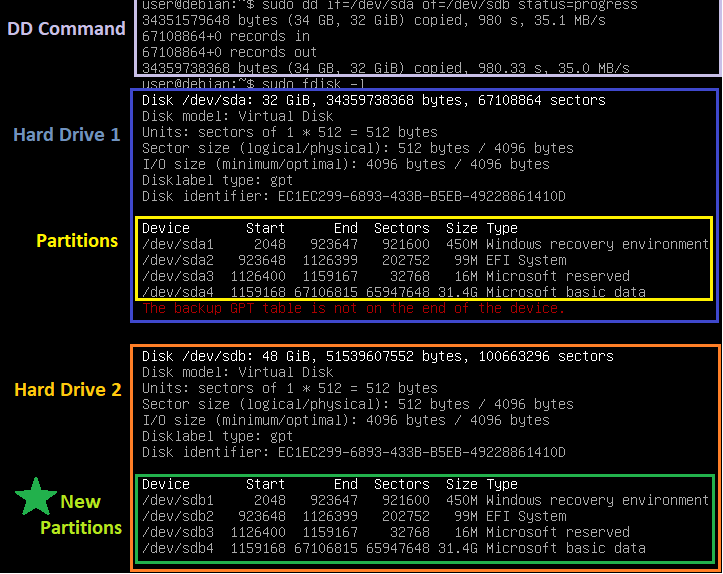
9) Once we have determined our source and destination disk, it is time to use the DD utility, which actually moves the data for us. the dd command takes in a few different parameters; if which is the input drive or our source disk, and of which is our output drive or our destination disk. There is another optional parameter which I find to be very helpful, which is the status parameter which takes the value "progress" and will give us a constant stream of information about our progress. Without this status parameter, the command will appear to just hang and the cursor will blink with seemingly nothing going on. However the copy will still be working in the background until who knows when.
Here is an example Command: sudo dd if=/dev/sda of=/dev/sdb status=progress where /dev/sda is our source and /dev/sdb is our destination. As the utility copies the data from one disk to another, we will see periodic transfer statistics.
Depending on the size of your hard drive, and the capabilities of your hardware, it may take several hours to complete. As many as 8 to 10 hours for a 1TB hard drive. If you want to double-check the operation, you can issue another sudo fdisk -l command and compare it to what you got before.
Whenever the copy is complete you can safely remove the flash drive and reboot your computer. If the old drive was bootable and had your operating system on it, you might want to remove the drive from your computer before you start the computer back up again. Optionally you can modify your boot priority in your BIOS like before and ensure the new hard drive is a higher priority than your old one.